How to Easily Convert Camcorder Tapes to Digital
This post provides exhaustive information on how you can easily and conveniently convert camcorder tapes to digital without losing quality; enabling you to view your favorite videos on digital devices.
Please, read on:
Almost everything we watch or listen to these days is digital. We can download or stream everything on any device, and on the go too.
This has made all forms of tapes, magnetic or plastic, lose their relevance and gradually fade.
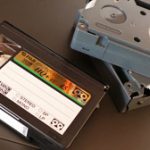
However, there may be many favorite memories stuck in your camcorder tapes, with labels that go way back and make you smile.
You wish they were digital so that you would easily access them without having to get a HI8 or VCR player, and wouldn’t have to worry about them getting damaged.
Plus, these tapes take up a lot of space, storage box after storage box holding massive collections of camcorder tapes covered in dust.
The iron oxide used in the making of these tapes, after a long time, start to separate from the plastic substrate, causing permanent damage to the videos and audios of the files.
This happens because the binders used to produce the videotapes are susceptible to damage via excess temperature change and humidity.
Hence, converting the tapes into a digital format is a brilliant form of preservation.
It is possible to hire the professional services of service providers to do this for you, but they may be a bit pricey, so it is best to get your hands dirty and learn this, for similar future projects.
How to Easily Convert Camcorder Tapes to Digital
Below are the steps involved in converting your camcorder tape to a digital format:
Step One:
The first thing to do is to get your stuff organized. Take an inventory of the camcorder tapes, index them, and organize them.
Determine how long you think it will take, and how many tapes you will be converting.
Step Two:
The tools you will need in this conversion process are important and specific.
If you’re lucky, you will probably have some or all of these tools.
First, you will need a computer, and a good one.
Inferior computers may not get the job done because you need a computer that can capture analog videos, render large digital files, has good graphics card, enough space, firewire card.
Ensure that your computer is not performing any other duties because multitasking is not advisable.
The next thing you will need is a capture card.
A capture card converts the analog video recording into a language your PC recognizes and understands.
The kind of capture card you need is the one that will not drop frames and examples include Matrox, Black Magic, and Canopus.
You also need a capture software tool, like Apple’s final cut or Adobe Premiere Pro.
They both offer an analog source material capture that is uncompressed.
There is also iMovie for Mac users; it is free, along with another called Windows Movie Maker.
You might need to learn how they work and a good way to do this is with YouTube.
Finally, you will need a camcorder or VCR for your tape(s).
For better results, get a clean lint-free cloth and 99% isopropyl and clean your video heads.
Step Three:
You are done with all of the preparations and now it’s showtime. Start by plugging the VCR in the capture device.
You can do this with an S-video cable or a composite cable. Open the capture software and dub function.
Load your camcorder tape in the player, click on ‘Record’, and then click on ‘Play’ on the deck.
Your camcorder tape must be played and recorded to the end, all in real-time.
This means that if the tape is four hours long, you will be spending four hours on it.
The capture software reflects exactly what will be seen as the final product.
After your tape is done playing, tap the ‘Stop’ button on the deck and the software.
Step Four:
Now, it is time for Post-production. You want to cut off parts of the recording you have no use of, or that are no good.
The end product is too large and will take up too much space, so it should be compressed.
You can use the H.264 codec or MP4 files to compress the recorded file.
After compression, export to iMovie, Premiere Pro, Windows Movie Maker, Final cut, or any others of your choice.
Your computer should take a few hours to complete the encoding of one file.
Once it is done, preview or test the file on your computer to see how well you have done.
Step Five:
You are done with the conversion and you can now access your camcorder tapes on any of your devices; computer, smartphone, Xbox, etc.
However, this is not the end.
If your files are not properly backed up, you still may end up losing them one day when your device crashes unexpectedly, gets stolen, or gets missing.
It is important to make several copies, on DVDs, external hard drives, thumb drives, or on cloud services, this way, you have your files forever.
Now you’re all done.
Congratulations, you have been able to save some of your favorite memories, for yourself, for your family, and your loved ones.
Videotapes last the shortest, compared to other mediums, and this makes it important to digitize your camcorder collection and back them up.
Conclusion
If you are looking to convert your camcorder tapes to digital format so you can play them on the various digital devices available, this article has provided tips you can apply.
|
If you have a need to get a good video converter and you want some help on the one to go for, here are our top seven pick that you can check out
Check them out here:
Amazing Software for Converting Videos. |
 7 Best Software for Converting Videos to Various Formats